
10.0.0.0.1 – 10.0.0.1 is the default IP address to login admin panel of a router. It is often mistyped as 10.0.0.0.1 which will return an invalid webpage.
10.0.0.1 belongs to the private class of the IP addresses and it is used to access the Admin Panel of the Router. It is set by default by the router manufacturer and to change the settings of the router such as WiFi Password, Name (SSID), you need to login to the Admin Panel.
Not working? Try –
How to log in to 10.0.0.1?
You can log in to 10.0.0.1 using the default username & password and access the settings of the router. Logging in isn’t a very complicated process, and you just need to be connected to the router in order to access the settings. Follow this quick guide to login to 10.0.0.1 –
- Open your preferred web browser.
- In the address bar, type http://10.0.0.1 or 10.0.0.1. Don’t type 10.0.0.0.1 as such IP address doesn’t exist.
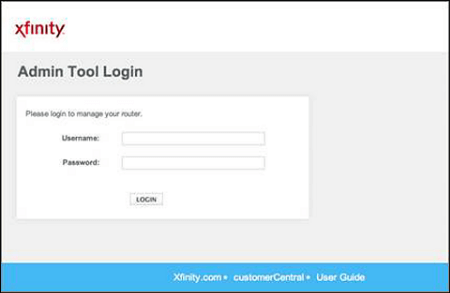
- A login page of your router’s manufacturer will appear. Type in the default username and password.
Pro Tip: This username and password isn’t the same as your WiFi network username and password. If you haven’t changed it earlier, the default is:
Username: admin
Password: password (If the login credentials didn’t worked, check our list of default router passwords)
- Given that the provided username and password are correct, you will be logged in into the Admin Panel of your router.
Note: If you are logged in to your router settings page for the first time it is recommended to change your default password for security reasons. Leaving your wireless network unprotected can let other people access your network and can gain sensitive information such as your passwords and credit card numbers.
Use a strong password that is at least 8 characters, contain numerical digits with both upper and lower case letters and a special character such as ! @ # $ ?.
Unable to access 10.0.0.1?
If you are having issues to access 10.0.0.1 then it may be that:
- The default gateway address of your router or device is other than 10.0.0.1 due to which the browser is not able to locate the Admin Panel at 10.0.0.1. Find the correct gateway address and try again.
- You are not typing the correct IP address in the URL bar of the browser. Sometimes, users may type www.10.0.0.1.com, add https:// at beginning, mistake “0” (zero) for “O” or 10.0.0.0.1 which is an invalid address as a gateway IP address contain four decimal numbers which is represented in dot-decimal notation and here it is of five values due to which you are having trouble to access the Admin Panel.
- Performing a restart of your WiFi network and router is the most common way of fixing. Wait at-least few minutes before reconnecting to your network.
- Ensure you are able to browse other websites, in case of network outages from your ISP during peak hours you may encounter such issue.
- Your browser stores cache and cookies locally in your device, try removing them.
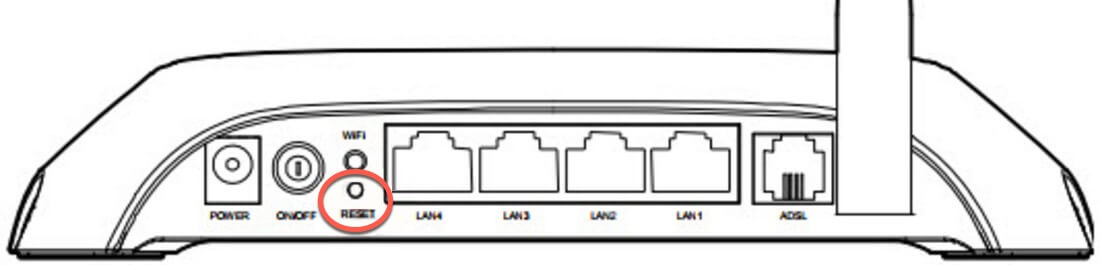
- In case some misconfiguration occurred in your previous session, you may perform reset your gateway to its factory default settings. To reset your router configuration to its default settings unplug your router power and press the small “reset” button at the back of it for about 10 seconds. Once the lights at the front of router starts blinking it means the modem has successfully reset.
Note: Factory reset should be your last option if all previous methods didn’t worked as this is not same as “restart” because this will revert all your manual settings such as your SSID (network name), password, guest networks, MAC filtration.
During this process any device connected to the WiFi (laptop, mobile, TV) will get disconnected. If you are using Xfinity Voice you will be not able to make or receive any calls including emergency calls until the gateway is back online.
Advanced Wireless Gateway Settings
By default the security settings for your Wireless Gateway is WPA/WPA2 – which is the best WPA security as of today since previous version was vulnerable which means attackers can access your internet remotely. However you may be able to configure as per your requirements from Wireless Settings.
You can also setup firewall, parental control (to block access to certain websites), IP & MAC binding, bandwidth control, port forwarding or port triggering when you want to add a game to your home network.
It is advised to turn on automatic firmware update to keep your router safe however if such option is not available you can manually download and install the software from manufacturer website every two to three months.